
If you’re like me, you like having fresh herbs on hand for cooking. Â You can run out to your garden or window box, pluck a few sprigs, and add a splash of color and flavor to just about any dish you prepare. Â As Fall starts to roll around though, you notice your parsley drooping, your basil getting spotty and yellow, and your thyme slowing to a crawl. Â Some herbs are perennials, and will be along again in the spring. Â The basil and parsley though aren’t so lucky. Â Instead of tossing your window box or hanging basket of herbs into the compost heap you can transplant them into a container. Â Not only will this provide you with seasonings over the winter, it will add a pleasant scent to the room where you keep them!
Materials:
- Sturdy pot (I used a tree pot as a liner, and a decorative pot with a rolling base.)
- Gravel
- Potting Soil
- Coarse Sand
Tools:
- Gloves
- Trowel
- Cultivator
- Serrated knife
- Watering can
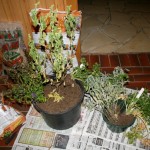
First, lets take a look at the herbs I’m going to transplant.

Well that’s pretty sad. Â This hanging basket of herbs was $10 at a local garden center, and provided us with tasty herbs all summer long. Â Now, I’m planning to wring every last penny out of these guys!
There’s a total of 7 plants in this hanging basket, and at this point they are way overgrown for the pot and have become rootbound. Â The transplant won’t be as cut and dry as repotting an individual herb, but this is still a project that can easily be finished in 1 evening after work. Â I even had enough time to make a stromboli when I was finished!
Start out by laying out newspaper. Â When you inevitably make a mess, newspaper should prevent your girlfriend or wife from killing you.
I had a tree pot left over from the previous homeowner that was a perfect fit for these plants, and for the decorative pot I will eventually put them in. Â A terracotta pot or window box would also work for this project depending on how many plants you have.

Most potted plants require good drainage to prevent water pooling in the container and root rot. Â For a container of this size (15-18″), I use about 2 inches of coarse gravel for drainage in the bottom of the pot. Â The pebbles range from 3/4 to 1-1/2″.
After the drainage base is laid down, it is time to prepare the soil for your little buddies.  It is tempting to just use straight potting soil, and this will certainly make your herbs grow faster.  However, if the soil is too rich or if fertilizer is used, the leaves the plants produce will be less flavorful.  I typically combine 1 part coarse sand with 2 parts organic potting soil.  This mix will provide the proper level of nutrients, adequate drainage, and loose soil for the roots to work through.

For me, mixing the soil in smaller batches in a separate bucket makes things easier. Â Not only can you use the markings on the bucket to dial in your mixture, you can even pick up the bucket and swirl the contents around to mix them faster. Â If you’re not strong enough to pull this feat off, you can add and mix the components a few inches at a time to speed things along. Â (2″ soil 1″ sand, mix, 2″ soil 1″ sand, mix) Â Mix a little more soil than you need. Â If you can’t find a use for it right away, just put it in a spare bag for later.

Pack the soil down periodically as you’re filling the pot.  Fill the pot about 2″ to 1-1/2″ from the rim.  The extra space will be taken up by the root balls of your plants, or extra soil can be added at the end.  Remember how I told you to make extra?

Using the serrated knife, carefully separate the root systems of your herbs. Â If they’re root bound like mine were, they’ll take some persuading. Â I typically plant the knife midway between the stems of the plants and work out from there. Â Try to pay attention to any slope in the stem, and avoid cutting any large roots directly under the plant. Â Make sure to wear some heavy leather gloves, and be very careful. Â No amount of brownie points from the house chef is worth a trip to the ER.
Once the plants are separated, mark out their new locations in the pot with your finger, and start digging. Â Backfill around each plant once it is in the hole, and make sure the soil is level with the top of the root system. Â Don’t bury the above ground portion of the stem.
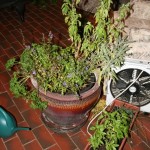
 After all the herbs are transplanted, place the liner in a decorative pot if you want.  Finish up with a solid watering, and another watering a few hours later.  Clean up your tools and any leftover materials, and crack open a beer!
The herbs will do well in any south or west facing window with 8 hours of daylight.  They will survive on as little as 4 hours of light, but their growth will slow noticeably.  This can be fixed with either a fluorescent or sodium grow light from a hardware store or garden center.  Keep them watered, but don’t drown them.
I’ll post a follow up picture in a few weeks to show you how they’re getting on!

-
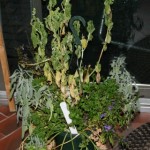
- Soon these guys will be transplanted to their new home!
-
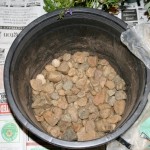
- Gravel should be added for drainage.
-
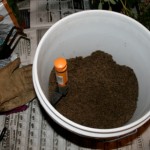
- 2 to 1 mix of potting soil and coarse sand .
-
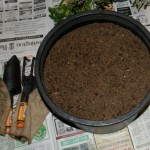
- Fill the pot to within 2″ of the top of the pot.
-
- Separating the root balls and planting.
-
- Admire your work